ToC
概念和术语
状态机本身是一个数学计算模型,只要作用是抽象机器可以在任何给定事件恰好处于有限数量的状态之一中。状态存储关于过去的信息,就是说:它反映从系统开始到现在时刻的输入变化。转移指示状态变更,并且用必须满足确使转移发生的条件来描述它。动作是在给定时刻要进行的活动的描述。有多种类型的动作:
- 进入动作(entry action):在进入状态时进行
- 退出动作(exit action):在退出状态时进行
- 输入动作:依赖于当前状态和输入条件进行
- 转移动作:在进行特定转移时进行
FSM(有限状态机)可以使用上面图1那样的状态图(或状态转移图)来表示。此外可以使用多种类型的状态转移表。下面展示最常见的表示:当前状态(B)和条件(Y)的组合指示出下一个状态(C)。完整的动作信息可以只使用脚注来增加。包括完整动作信息的FSM定义可以使用状态表。
| 当前状态→ 条件↓ | 状态A | 状态B | 状态C |
|---|---|---|---|
| 条件X | … | … | … |
| 条件Y | … | 状态C | … |
| 条件Z | … | … | … |
光看概念和定义我们还是很难理解这个东西到底有什么用,所以我们尝试结合示例来进行学习。
XState
状态机的实现有很多,但这次我们使用一个现成且较为成熟的方案 xstate 来进行状态机的学习。以下是官网的例子:
1import { createMachine, interpret } from 'xstate';2
3// 无状态的状态机定义4// machine.transition(...) 是解释器使用的纯函数。5const toggleMachine = createMachine({6 // 状态机的名字7 id: 'toggle',8 // 状态机的初始值9 initial: 'inactive',10 // 状态机的状态35 collapsed lines
11 states: {12 // states 下的第一层对象,每一个键名都表示的是一个状态13 inactive: {14 // on 表示的是触发什么事件的时候,相当于是一个监听器15 on: {16 // 当触发 TOGGLE 事件时,将状态值变更为 active17 TOGGLE: { target: 'active' }18 }19 },20 // 另一个状态名21 active: {22 on: {23 // 当处于 active 时,触发 TOGGLE 事件后,状态流转到 inactive24 TOGGLE: { target: 'inactive' }25 }26 }27 }28});29
30// 具有内部状态的状态机实例31const toggleService = interpret(toggleMachine)32 // 当状态变更的时候打印出变更的状态,包括初始值33 .onTransition((state) => console.log(state.value))34 //35 .start();36// => 'inactive'37
38// 在当前状态触发 TOGGLE 事件,如果这个状态已经开始39// 则会立即触发状态流转的事件,如果没有调用 start() 方法40// 这次状态流转的事件则会被放进一个内部的队列,等待状态启动的时候会被执行41toggleService.send({ type: 'TOGGLE' });42// => 'active'43
44toggleService.send({ type: 'TOGGLE' });45// => 'inactive'以上例子阐述了 xstate 大致的工作流程,在这个工作流程中,展现了一个状态机从声明状态、流转状态和监听状态的过程,而以上这一整个工作流程就是一个完整的状态机流程。
有限状态机
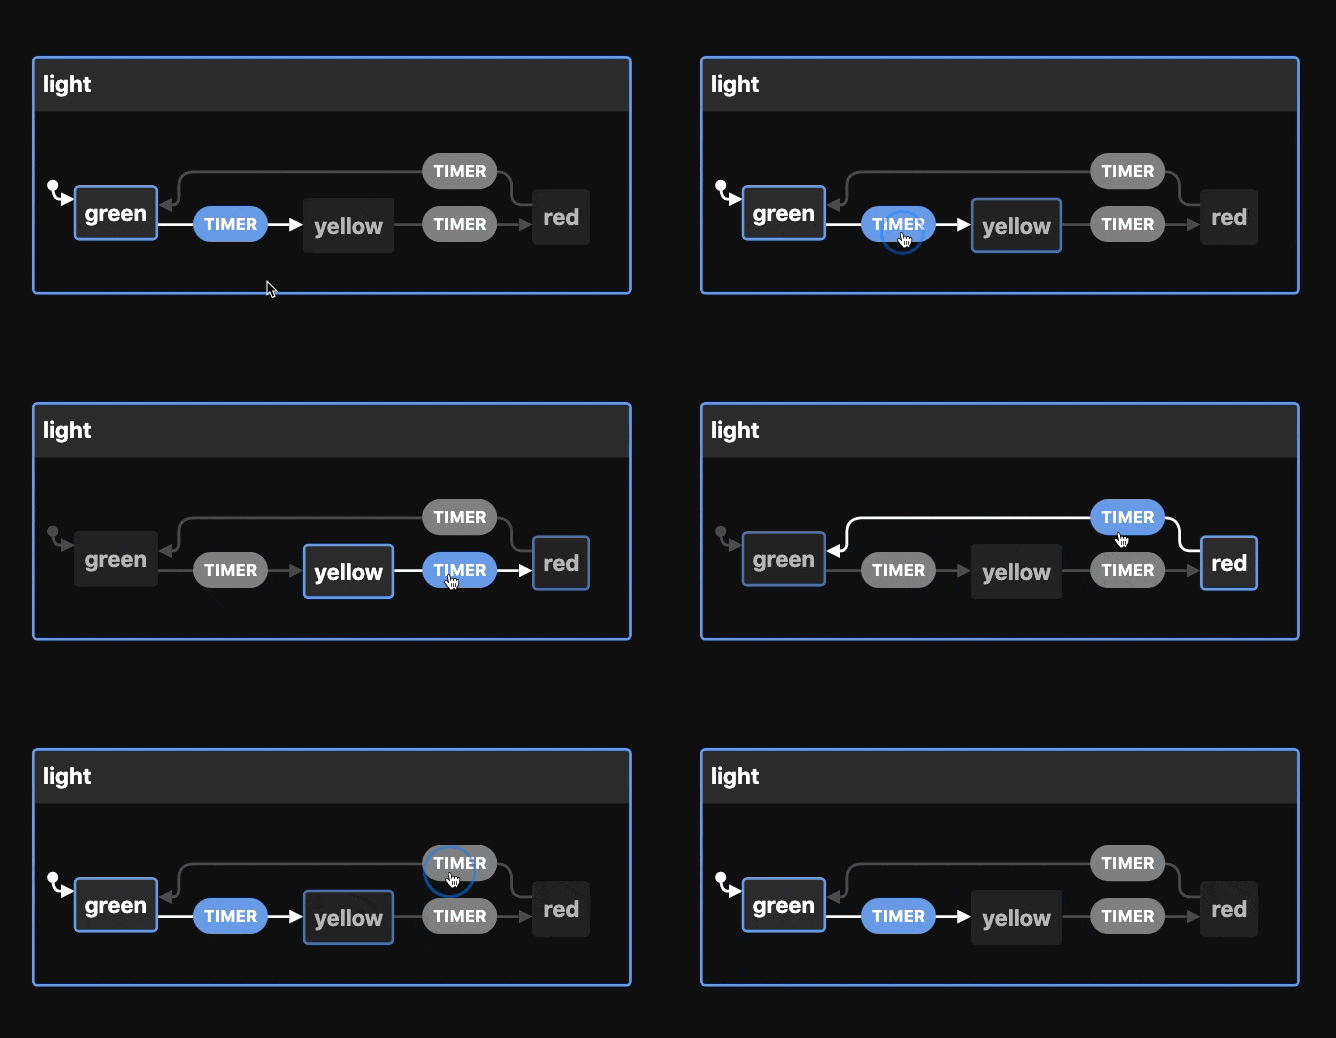
而在官网的例子中还有着这样一个可交互的实例,它的示例如下:

1import { createMachine } from 'xstate';2
3const lightMachine = createMachine({4 id: 'light',5 initial: 'green',6 states: {7 green: {8 on: {9 TIMER: { target: 'yellow' }10 }19 collapsed lines
11 },12 yellow: {13 on: {14 TIMER: { target: 'red' }15 }16 },17 red: {18 on: {19 TIMER: { target: 'green' }20 }21 }22 }23});24
25const currentState = 'green';26
27const nextState = lightMachine.transition(currentState, { type: 'TIMER' })28 .value;29// => 'yellow'其实这个和上面来回切换的开关是一样的,只不过在状态数量方面有一点不同,但它们做的事情是完全一致的,都是在几种预设好的状态中不断切换,但仅仅是实例我们还很难说明使用状态机的好处到底在哪,所以我们需要通过更具体的实际场景来体现使用状态机来管理状态有哪些好处。
以 Vue3 来举例,以下是一个开关的例子,它是一个可以无限循环切换状态的开关,在点击的时候状态会在 active inactive 之间来回切换,并在切换到 active 状态的时候将计数器递增,不使用状态机的代码如下:
1<template>2 <button @click="toggleState">Click me ({{ state === "active" ? "✅" : "❌" }})</button>3 <p>4 <code>5 count:6 <strong>{{ count }}</strong>7 【{{ state }}】8 </code>9 </p>10</template>16 collapsed lines
11
12<script setup>13import { ref } from 'vue'14
15const count = ref(0)16const state = ref('inactive')17
18const toggleState = () => {19 if (state.value === 'inactive') {20 state.value = 'active'21 count.value += 122 } else if (state.value === 'active') {23 state.value = 'inactive'24 }25}26</script>在 toggleState() 方法内部的实现中会对当前状态进行判断,从而设置下一个状态,并且更新其他的副作用依赖值,但以上代码仅仅符合目前只有两种状态的需求,如果第三种状态假如以后则需要再添加一个分支判断。伴随着第三种状态的加入,需求也有了一点小的变更:
- 一共有
inactive、active、disabled三种状态; - 初始状态为
disabled,状态流转的过程为:disabled=>inactive=>active - 当状态从
disabled状态切换为inactive或active状态后,则无论如何都无法将状态切换为disabled inactive和active之间的状态流转规则不变,依然可以从inactive切换到active,从active切换到inactive
根据以上需求,我们可以将代码修改成:
1const state = ref('disabled')2
3const toggleState = () => {4 if (state.value === 'disabled') {5 state.value = 'inactive'6 return7 }8
9 if (state.value === 'inactive') {10 state.value = 'active'5 collapsed lines
11 count.value += 112 } else if (state.value === 'active') {13 state.value = 'inactive'14 }15}如果以后再新增加状态的话,对原有代码的改动还是会慢慢变大,就会导致在一个方法中不断垒代码,但如果使用状态机来管理这个状态流转过程的话,一切会简单许多:
1<template>2 <div id="app">3 <button @click="send('TOGGLE')">4 <!-- 通过匹配当前状态是否为目标状态 -->5 Click me ({{ state.matches("active") ? "✅" : "❌" }})6 </button>7
8 <code>9 count:10 <!-- 获取状态机中上下文所依赖的 count 变量 -->40 collapsed lines
11 <strong>{{ state.context.count }}</strong>12 <!-- 读取当前状态 -->13 【{{ state.value }}】14 </code>15 </div>16</template>17
18<script setup>19import { createMachine } from "xstate";20import { useMachine } from "@xstate/vue";21
22// 创建一个状态机23const toggleMachine = createMachine({24 id: "toggle",25 predictableActionArguments: true,26 // 初始状态为 disabled27 initial: "disabled",28 context: {29 // 当前状态机中所依赖到的局部变量30 count: 0,31 },32 states: {33 disabled: {34 // 当切换状态的时候只能切换到 inactive35 on: { TOGGLE: 'inactive' }36 },37 inactive: {38 on: { TOGGLE: "active" },39 },40 active: {41 // 当进入 active 状态的时候,更新当前状态机上下文中的 count 变量42 entry: (context) => { context.count += 1},43 on: { TOGGLE: "inactive" }44 },45 },46});47
48// 暴露一个包含当前状态的 State ref 和一个通知状态流转的方法49const { state, send } = useMachine(toggleMachine);50</script>状态机处理的方式是我认为还比较优雅的方式,它通过在 states 对象下设置状态变量来隔离所有状态之间的关联性,
通过 entry 钩子来实现进入状态时需要进行的操作事件,当然还可以使用 exit() 钩子来实现退出当前状态时需要执行的操作事件。而更新 context 变量还可以通过 assign() 方法来实现批量更新:
1import { assign } from 'xstate'2
3...4
5const toggleMachine = createMachine({6 ...,7 states: {8 active: {9 // 当进入 active 状态的时候,更新当前状态机上下文中的 count 变量10 entry: assign({7 collapsed lines
11 count: (ctx) => (ctx.count + 1),12 test1: (ctx) => (ctx.test1 || 0) + 113 }),14 on: { TOGGLE: "inactive" }15 }16 }17}最后
以上还只是对状态机概念的理解与实际应用,总得来说,状态机的出现就是为了解决应用程序在多个状态之间流转的繁琐处理,同时将状态与状态之间的复杂关联解耦,使得它们之间的关系更加纯粹。